![An image to describe post [Catjourney #005] How to Use Magnific Relight to Transform Selfies into Professional Portraits & Create Product Photos](https://static.quail.ink/media/mxx82t6ywo.webp)
🔥 [English Version] How to Transform Selfies into Professional Portraits & Create E-commerce Product Images with Magnific Relight
Basic Parameter Explanation for Magnific Relight and Some Case Overviews
(Translated by Claude 3.5 Sonnet ❤️)
💰 You can use "LYSON" as the promotion code and get 30% discount!
My recent post about AI portraits / product photography / pet photography went viral, so today I'll explain how it's done, especially why my AI portrait photography can achieve such high fidelity. We'll be using the latest Relight feature from magnific.ai. This product is a bit pricey, previously famous for its high-quality Upscale function, which also consumes Credits very quickly... Generally, one Upscale costs at least 15 Credits. However, Style Transfer and the latest Relight feature only consume 5 Credits per use. Currently, I haven't seen any open-source workflow integrating IC-Light that can achieve the effect of this commercial product. So today, let's introduce the usage strategy:
![An image to describe post [Catjourney #005] How to Use Magnific Relight to Transform Selfies into Professional Portraits & Create Product Photos](https://static.quail.ink/media/9zzn4spd3g.webp)
Style Transfer is for transferring styles. For example, if you want to convert a selfie to a clay style, you can use this feature. We've discussed this before, and you can review it here: Detailed Magnific Transfer Style Tutorial: https://x.com/lyson_ober/status/1768428605208748059
![An image to describe post [Catjourney #005] How to Use Magnific Relight to Transform Selfies into Professional Portraits & Create Product Photos](https://static.quail.ink/media/588wnbpkw9.webp)
Relight, on the other hand, can transfer the light source environment and position based on Text Prompt, Image Reference, or Light Map without changing the image style. For instance, if you just want to change the light source of a photo without converting it to an anime style, then you choose Relight. Additionally, changing the light source involves deciding whether to change the background. Sometimes, you just want to change the light source without altering the background; other times, you might want to change the background to match the expected light source environment. For example, see the image below:
![An image to describe post [Catjourney #005] How to Use Magnific Relight to Transform Selfies into Professional Portraits & Create Product Photos](https://static.quail.ink/media/kzzomsgw9p.webp)
This selfie transformed into an AI portrait photo uses the middle image as a light source reference, with the Change Background option checked. As for Light transfer strength, it controls the intensity of the transfer. In short, the lower the value, the less change in the original image's light source environment; the higher the value, the closer it gets to the reference image's environment.
![An image to describe post [Catjourney #005] How to Use Magnific Relight to Transform Selfies into Professional Portraits & Create Product Photos](https://static.quail.ink/media/evvw3s4p97.webp)
Style refers to the image style, usually set to the default Standard. In fact, it's hard to say which Style is more suitable for your case. Even if I make multiple images to compare styles, it may not be entirely consistent in your scenario. So I recommend you test according to your needs. For example, for the portrait image above, I guess using Darker but realistic might work better, so I plan to try it. Many people might prefer a "fresh and bright Japanese photography" style, and I guess using Brighter would work better. I won't explain Interpolate from original in detail here. All parameters have a "question mark button" next to them; click it to expand detailed function explanations, which you can check yourself.
Finally, there's Advanced settings. Be sure to try adjusting the parameters here. When expanded, you'll find the top parameters are Whites, Blacks, Brightness, Contrast, Saturation. Sounds familiar, right? These are the basic exposure parameters in Lightroom, or Camera Raw in PS, or the photo editing software on your phone. For example, for a "fresh and bright Japanese photography" style, I usually reduce Contrast and increase Brightness a bit.
Regarding the adjustment of these parameters, I strongly recommend searching for videos like "basic photography post-processing parameter explanation" on YouTube or Bilibili to understand. Here, I mainly want to emphasize the Engine parameter. If you want the style to be more realistic, I recommend choosing Real. For example, for the photography portrait above; if you're working on a comic image, I recommend using Illusio.
![An image to describe post [Catjourney #005] How to Use Magnific Relight to Transform Selfies into Professional Portraits & Create Product Photos](https://static.quail.ink/media/lxxd3tzlg8.webp)
For instance, if you want to create comics today, how do you draw scenes? I recommend using Tripo3d.ai. On the surface, it's a 3D model generation software, but in reality, it's also a comic tool. How to understand this? Let's say your comic scene is a castle. You might be limited by technique or time to draw materials from different angles. However, tripo3d.ai can generate 3D models in seconds through text prompt / single image. Next, you don't even need to download the model; just rotate, zoom in, and out in the 3D preview window, then take screenshots directly.
![An image to describe post [Catjourney #005] How to Use Magnific Relight to Transform Selfies into Professional Portraits & Create Product Photos](https://static.quail.ink/media/4rrzntx5nw.gif)
This way, you get images of the same object from different angles. Then you can take the screenshots to Magnific and use Upscale to enlarge the pixels, details, and image quality, followed by Relight on the same image. Finally, you'll get background images with beautiful backgrounds, consistent scenes, and consistent lighting. Of course, you can also switch the order of these two steps, Relight first, then Upscale. However, in Advanced Settings, choose Illusio for the Engine. I've made a simple case here, see the image below. For more information, please see: https://x.com/lyson_ober/status/1804185951381688495
![An image to describe post [Catjourney #005] How to Use Magnific Relight to Transform Selfies into Professional Portraits & Create Product Photos](https://static.quail.ink/media/9zzn4spd35.webp)
Lastly, to put it simply, if you want to control "randomness", remember to check Fixed Generation under Advanced Settings. This way, completely identical parameters will yield the same result. Light transfer A and B both control the intensity of light (according to the description). My personal understanding is that they control the position and intensity of the light source. I suggest you experiment and try more on your own, as different images will have different effects, and I can't generalize. Additionally, to supplement the usage of Lightmap, here's a quote from @koldo2k's explanatory video, original text: https://x.com/i/status/1804574673184641280
![An image to describe post [Catjourney #005] How to Use Magnific Relight to Transform Selfies into Professional Portraits & Create Product Photos](https://static.quail.ink/media/d22z6smldv.gif)
Magnific Selfie to Portrait Case Analysis
After explaining the parameters, let's talk about how we achieve high-precision replication in portrait photography and product photography cases. In fact, during experiments, I found that if the Light transfer strength value is too low (below 30%), the atmosphere and light source transfer effect might not be in place; conversely, if the value is too high, it might accidentally affect facial / e-commerce product details. How to achieve the best of both worlds? My solution is Magnific + PS. The whole process is very simple. Even if you've never used PS before, you can understand it at a glance. Read on 👇
![An image to describe post [Catjourney #005] How to Use Magnific Relight to Transform Selfies into Professional Portraits & Create Product Photos](https://static.quail.ink/media/8ee7dh08yw.webp)
For very clear close-up photos, the Relight effect is quite good, and the direct output is completely usable. Now, let's take an AI-generated portrait from Catjourney as an example:
![An image to describe post [Catjourney #005] How to Use Magnific Relight to Transform Selfies into Professional Portraits & Create Product Photos](https://static.quail.ink/media/388rlbeo8z.webp)
Then you can go to RED (Xiaohongshu), INS, Catjourney to find a photo you like as a light source reference. For example, I found a photo taken by photographer Jane Hu (ID: janehu520520520) on RED, and I think her photography style is great. If you like it, remember to follow her 👉 Profile
(The image has been authorized by the photographer for use in this tutorial)
![An image to describe post [Catjourney #005] How to Use Magnific Relight to Transform Selfies into Professional Portraits & Create Product Photos](https://static.quail.ink/media/6nn5xue565.webp)
Magnific Relight parameters are as follows:
- Light transfer strength: 85%
- Uncheck Interpolate from original
- Check Change background
- Style: Clean
- Advanced Settings:
- Whites: 55%
- Blacks: 45%
- Brightness: 55%
- Contrast: 48%
- Saturation: 52%
- Engine: Real
- Light transfer A: Automatic
- Light transfer B: Automatic
The result is as follows:
![An image to describe post [Catjourney #005] How to Use Magnific Relight to Transform Selfies into Professional Portraits & Create Product Photos](https://static.quail.ink/media/o44pef2po2.webp)
As you can see, the result is pretty good (in my opinion). However, if you want the facial features to be closer, the best way is to use PS to cut out the faces from the original image and the direct output image from Magnific. The specific steps are as follows:
- First, put both images in.
- Select the original image layer, use the Pen tool (shortcut is P), use the mouse to circle around the face to enclose it, then press the shortcut Cmd + Enter to create a selection (blue line turns into black and white line, commonly known as marching ants). Then press Cmd + J to copy the current selection as a new layer, select it. Please note that this step doesn't need to be very precise, but it's always good to be as close as possible. So there's not a huge workload, and I'll explain why below.
![An image to describe post [Catjourney #005] How to Use Magnific Relight to Transform Selfies into Professional Portraits & Create Product Photos](https://static.quail.ink/media/vmmekiz85g.webp)
- Select this new layer, use PS's Neural Filters → Harmonization → Use Magnific's image as a reference layer → Adjust the reference strength and other parameters. The specific strength value here only needs to be adjusted according to your ideal situation. For example, here I maxed out the reference strength and increased the brightness a bit.
![An image to describe post [Catjourney #005] How to Use Magnific Relight to Transform Selfies into Professional Portraits & Create Product Photos](https://static.quail.ink/media/r88ynbdr9v.webp)

- Now, if you're not satisfied with the facial light blending effect, you can click on the Magnific layer and press Cmd + J to cut out a layer with the same selection. Place it on top of all layers, then choose a suitable layer blending mode. Here, you don't need to understand what the principle of each blending mode is. Just hover your mouse over them as shown in the image below to see which blending effect is most satisfactory. After choosing, turn on/off the little eye button on the left side of the layer to compare. In this example, I won't do this step because I think the effect of step 3 is already very good. But later when we talk about the Trozk case, you might need to use this step. Especially in the Sspai case with the glowing display. (See: https://x.com/lyson_ober/status/1804848156766851416)
![An image to describe post [Catjourney #005] How to Use Magnific Relight to Transform Selfies into Professional Portraits & Create Product Photos](https://static.quail.ink/media/2xxnmtrdkv.gif)
- Now let's solve the issue of unblended edges from the cutout. In fact, there are countless ways to solve this problem, but I think with AI, the simplest method is to select a very narrow edge selection, then use PS generative fill. The advantage of this method is: the effect is very good, the learning cost is low, so even novices can get started.
- First, we use the Pen tool to draw a circle along the inner edge (quickly click-click-click, don't worry about precision).
- Then, we still press Cmd + Enter to create a selection (get marching ants).
![An image to describe post [Catjourney #005] How to Use Magnific Relight to Transform Selfies into Professional Portraits & Create Product Photos](https://static.quail.ink/media/588wnbpkl9.gif)
- Then, we click Select menu in the window → Save Selection → Name it "contract".
![An image to describe post [Catjourney #005] How to Use Magnific Relight to Transform Selfies into Professional Portraits & Create Product Photos](https://static.quail.ink/media/z554einvgy.gif)
- Next, we click Select menu → Expand Selection → 15px (depending on your specific situation)
- Select → Load Selection → Subtract from Selection → This way we get a ring-shaped area. It's equivalent to subtracting the small area from the large area, thus obtaining a ring-shaped area.
- If the size is not suitable, you can expand or reduce the range based on this ring-shaped area.
- Use AI Generative Fill, and it's done~
![An image to describe post [Catjourney #005] How to Use Magnific Relight to Transform Selfies into Professional Portraits & Create Product Photos](https://static.quail.ink/media/kzzomsgw2p.gif)
- Additional tip: In fact, mobile photo editing software has become a daily necessity for the public. So you can even use software like Hypic to modify parts of the face like the jawline, for better results!
- And in the following product case, you can also add effects like glow in the effects section.
- Or, if you're a professional, I don't need to say more, just use the shortcut Cmd + Shift + A in PS to open Camera Raw for further color adjustment or Cmd + Shift + X to open the Liquify tool.
- If you don't know how to adjust colors, I still strongly recommend that everyone study the basic operations of simply adjusting hue, saturation, and brightness of each color, which will help you better restore colors.
- For example, in this case, I simply adjusted the exposure of the photo and the brightness of the green.
![An image to describe post [Catjourney #005] How to Use Magnific Relight to Transform Selfies into Professional Portraits & Create Product Photos](https://static.quail.ink/media/7kkg7t8d9o.webp)
Magnific E-commerce Product Case Analysis
This part actually follows the same thought process as above. For example, let's take the building block socket co-produced by Sspai and Trozk as an example.
![An image to describe post [Catjourney #005] How to Use Magnific Relight to Transform Selfies into Professional Portraits & Create Product Photos](https://static.quail.ink/media/evvw3s4pl7.webp)
Let's demonstrate another one. First, prepare the original image, then I'll go to Catjourney to find an image as an ambient light reference.
![An image to describe post [Catjourney #005] How to Use Magnific Relight to Transform Selfies into Professional Portraits & Create Product Photos](https://static.quail.ink/media/4rrzntx53w.webp)
With Light transfer strength at 100%, the direct output effect is as follows. You can see that the environment and light source blend very well, but the product has indeed been deformed, which is absolutely unacceptable in the e-commerce field. However, the light source information of the "deformed product" in the image is indeed correct, don't waste this information! Now we can blend it with the original image processed by Neural Filters through layer blending~ (Please recall the steps mentioned in the portrait photography section)
![An image to describe post [Catjourney #005] How to Use Magnific Relight to Transform Selfies into Professional Portraits & Create Product Photos](https://static.quail.ink/media/9zzn4spde5.webp)
Below, we'll demonstrate the simple operation process in PS. Please note that since the pixels of the original image in this case are not very high, to ensure better results, please make sure your original image has as high pixels and image quality as possible.video here 👉 https://x.com/lyson_ober/status/1805249123639247247
Finally, a little addition: if there are some flaws in the details after blending, you can select the layer above (magnific - main), then press the shortcut key e to use the eraser tool to erase unwanted parts. Also, keyboard shortcuts [ and ] represent decreasing and increasing the eraser size respectively. There are many methods for cutting out images. If you find it troublesome, Clipdrop's automatic image cutout effect is pretty good: https://clipdrop.co/remove-background
![An image to describe post [Catjourney #005] How to Use Magnific Relight to Transform Selfies into Professional Portraits & Create Product Photos](https://static.quail.ink/media/8ee7dh08lw.webp)
That's all thanks! If U like it, remember to follow my twitter(@lyson_ober & @op7418), or subscribe to our Newsletter: https://quail.ink/catjourney
🔥 [中文版] 如何用 Magnific Relight 把手机自拍转为写真照 & 制作电商产品图
Magnific Relight 基础参数说明和一些案例概括
💰 你可以使用 "LYSON" 作为 promotion code,在支付时获得 30% 优惠!
前两天发的 AI 写真 / 产品摄影 / 宠物摄影的帖子火了,所以今天写一下具体是怎么实现的,尤其是我的 AI 人像摄影还原度为什么可以这么高。我们要用到的是 magnific.ai 最新的 Relight 功能。这个产品有一些小贵,之前因为其 Upscale 的超高质量而出名,当然 Upscale 消耗 Credit 的速度也是超快的…一般 Upscale 一次至少 15 Credit 的样子。然而 Style Transfer 和最新的 Relight 功能,一次都只消耗 5 点 Credit。目前尚未看到有什么集成了 IC-Light 的开源工作流能达到这种商用产品的效果。所以我们今天来介绍一下玩法攻略:
Style Transfer 是风格迁移,比方说你想要把一张自拍照转换为黏土风格,你就可以使用这个功能,之前我们已经讲过了,大家可以在这里复习:Magnific Transfer Style 超详细教程:https://x.com/lyson_ober/status/1768428605208748059
而 Relight,则是可以做到不转换风格的情况下根据 Text Prompt(文字提示词)、Image Reference(图片参考)、Light Map(光照贴图)三种之一来迁移光源环境和位置,但并不改变图片风格。比方说,你只是想改变摄影图的光源,而不是想转化为动漫风格,那么你就选择 Relight。另外,改变光源又涉及到判断是否要改变背景。有时候,你只是想改变光源,背景不改变;另一些时候,你又会希望改掉背景,以匹配预期的光源环境。举个例子,请看下图:
这张随手自拍照转 AI 写真照,就是以中间这张图片作为光源参考,同时勾选修改背景(Change Background)。至于 Light transfer strength,则是调控迁移的强度。简而言之,数值越小,则原图光源环境变化越小;数值越大,则更贴近参考图的环境。
Style 则是图片的风格,一般选择默认的 Standard。事实上,很难说哪种 Style 更适合你的案例。即便我做了多张图来对比风格,在你的场景中也未必完全一致。所以我推荐你根据自己的需求进行测试。举个例子,上面这张肖像图,我猜测可能使用 Darker but realistic 效果更好,所以打算试一试。还有很多朋友可能喜欢「清新明亮的日系摄影」风格,我猜测使用 Brighter 效果会更好。Interpolate from original 这里暂时不做详细说明,所有的参数后面都有一个「问号按钮」,点击一下就能展开详细的功能说明,大家可以自行查看。
最后是 Advanced settings,请一定要尝试调整这里的参数。展开后可以发现最上面的参数分别是 Whites, Blacks, Brightness, Contrast, Saturation。是不是很熟悉?这就是 Lightroom、或者 PS 里的 Camera Raw、或者你手机上修图软件的基本曝光参数。举个例子,对于「清新明亮的日系摄影」风格,我一般会减少对比度(Contrast),提高一些明亮度(Brightness)。
关于这些参数的调整,我强烈建议各位去 Youtube 或者 Bilibili 上搜索类似于「摄影后期基本参数讲解」的视频进行了解。在这里,我主要想强调的是 Engine 参数,如果你想要让风格更真实些,我推荐你选择 Real。例如上面的摄影写真;如果你做的是漫画图像,我推荐用 Illusio。
举个例子,假如你今天想创作漫画,如何绘制场景呢?我这里推荐大家使用 tripo3d.ai,表面上看这是一个 3d 模型生成软件,但实际上它还是漫画利器。怎么理解这句话?比如你的漫画场景是一座城堡。你可能会因为技术、时间有限而无法绘制不同角度的素材。然而,tripo3d.ai 这个网站可以通过 text prompt / single image 在几秒钟之内生成 3d 模型。接下来,你甚至不用 download model,直接在 3d 预览窗口旋转、放大、缩小视图,然后直接截图就行了。
如此以来,你就得到了同一个物体不同视角的图片。接下来你可以拿截图去 Magnific 里面使用 Upscale 对图片的像素、细节和画质进行放大,随后拿同一个图片去 Relight。最终你就可以得到背景优美、场景一致、光线也一致的背景图了。当然,你也可以调换上面的两个步骤,先 Relight,再 Upscale。不过呢,Advanced Settings 里面的 Engine 要选择 Illusio。我这里做了一个简单的案例,见下图。更多说明请看:https://x.com/lyson_ober/status/1804185951381688495
最后,简单来说,如果你想控制“随机性”,记得在 Advanced Settings 下面勾选 Fixed Generation。如此一来,完全相同的参数会得到一样的结果。Light transfer A 和 B 都是控制光线的强度(根据说明)。我个人的理解是控制光源的位置和强度,这里我建议大家自行多多实验和尝试,不同的图片会有不同的效果,我不好一概而论。另外,补充一下 Lightmap 的用法,这里引用一下 @koldo2k 的解释视频,原文:https://x.com/i/status/1804574673184641280
Magnific 自拍转写真案例拆解
讲解完了参数,下面我们来说说人像摄影、产品摄影案例中,我们是如何做到高精度复刻的?事实上,在实验过程中我发现:如果 Light transfer strength 数值太低(低于 30%),氛围和光源迁移的效果就可能不到位;反之,如果数值太高,又会一不小心影响人脸 / 电商产品细节。如何两全齐美呢?我的解决方案是 Magnific + PS。整个过程非常简单,即便你从来没用过 PS,也能一看就懂,往下看👇
非常清晰的特写照来说,Relight 效果很不错,直出完全可用。现在,我们在 Catjourney 上拿一张 AI 生成的肖像照作为案例:
随后你可以去小红书(RED)、INS、Catjourney 找到一张喜欢的图片作为光源参考。举例来说,我在小红书上找到了摄影师简妮(ID:janehu520520520)拍的照片,感觉她的摄影风格很棒。喜欢记得关注她 👉 主页
(图片已向摄影师获得授权使用于本教程中)
Magnific Relight 参数如下:
-
Light transfer strength: 85%
-
不勾选 Interpolate from original
-
勾选 Change background
-
Style: Clean
-
Advanced Settings:
- Whites:55%
- Blacks: 45%
- Brightness: 55%
- Contrast: 48%
- Saturation: 52%
- Engine: Real
- Light transfer A: Automatic
- Light transfer B: Automatic
得到下图结果:
可以看到,结果效果还不错(个人认为)。不过如果你想要让面部特征更接近,最好的方法就是利用 PS 抠图得到原图和 Magnific 直出图片的面部。具体步骤如下:
- 先把两张图放进去。
- 选中原图图层,利用钢笔工具(快捷键是 P),用鼠标围绕面部点一圈封闭起来,然后按快捷键 Cmd + Enter 建立选区(蓝色线条变成黑白线,俗称蚂蚁线)。然后按下 Cmd + J 把当前选区复制为一个新的图层,选中它。请注意,这一步并不需要非常精细,不过尽可能贴近总是好的。所以并不存在非常大的工作量,原因下面我会说。
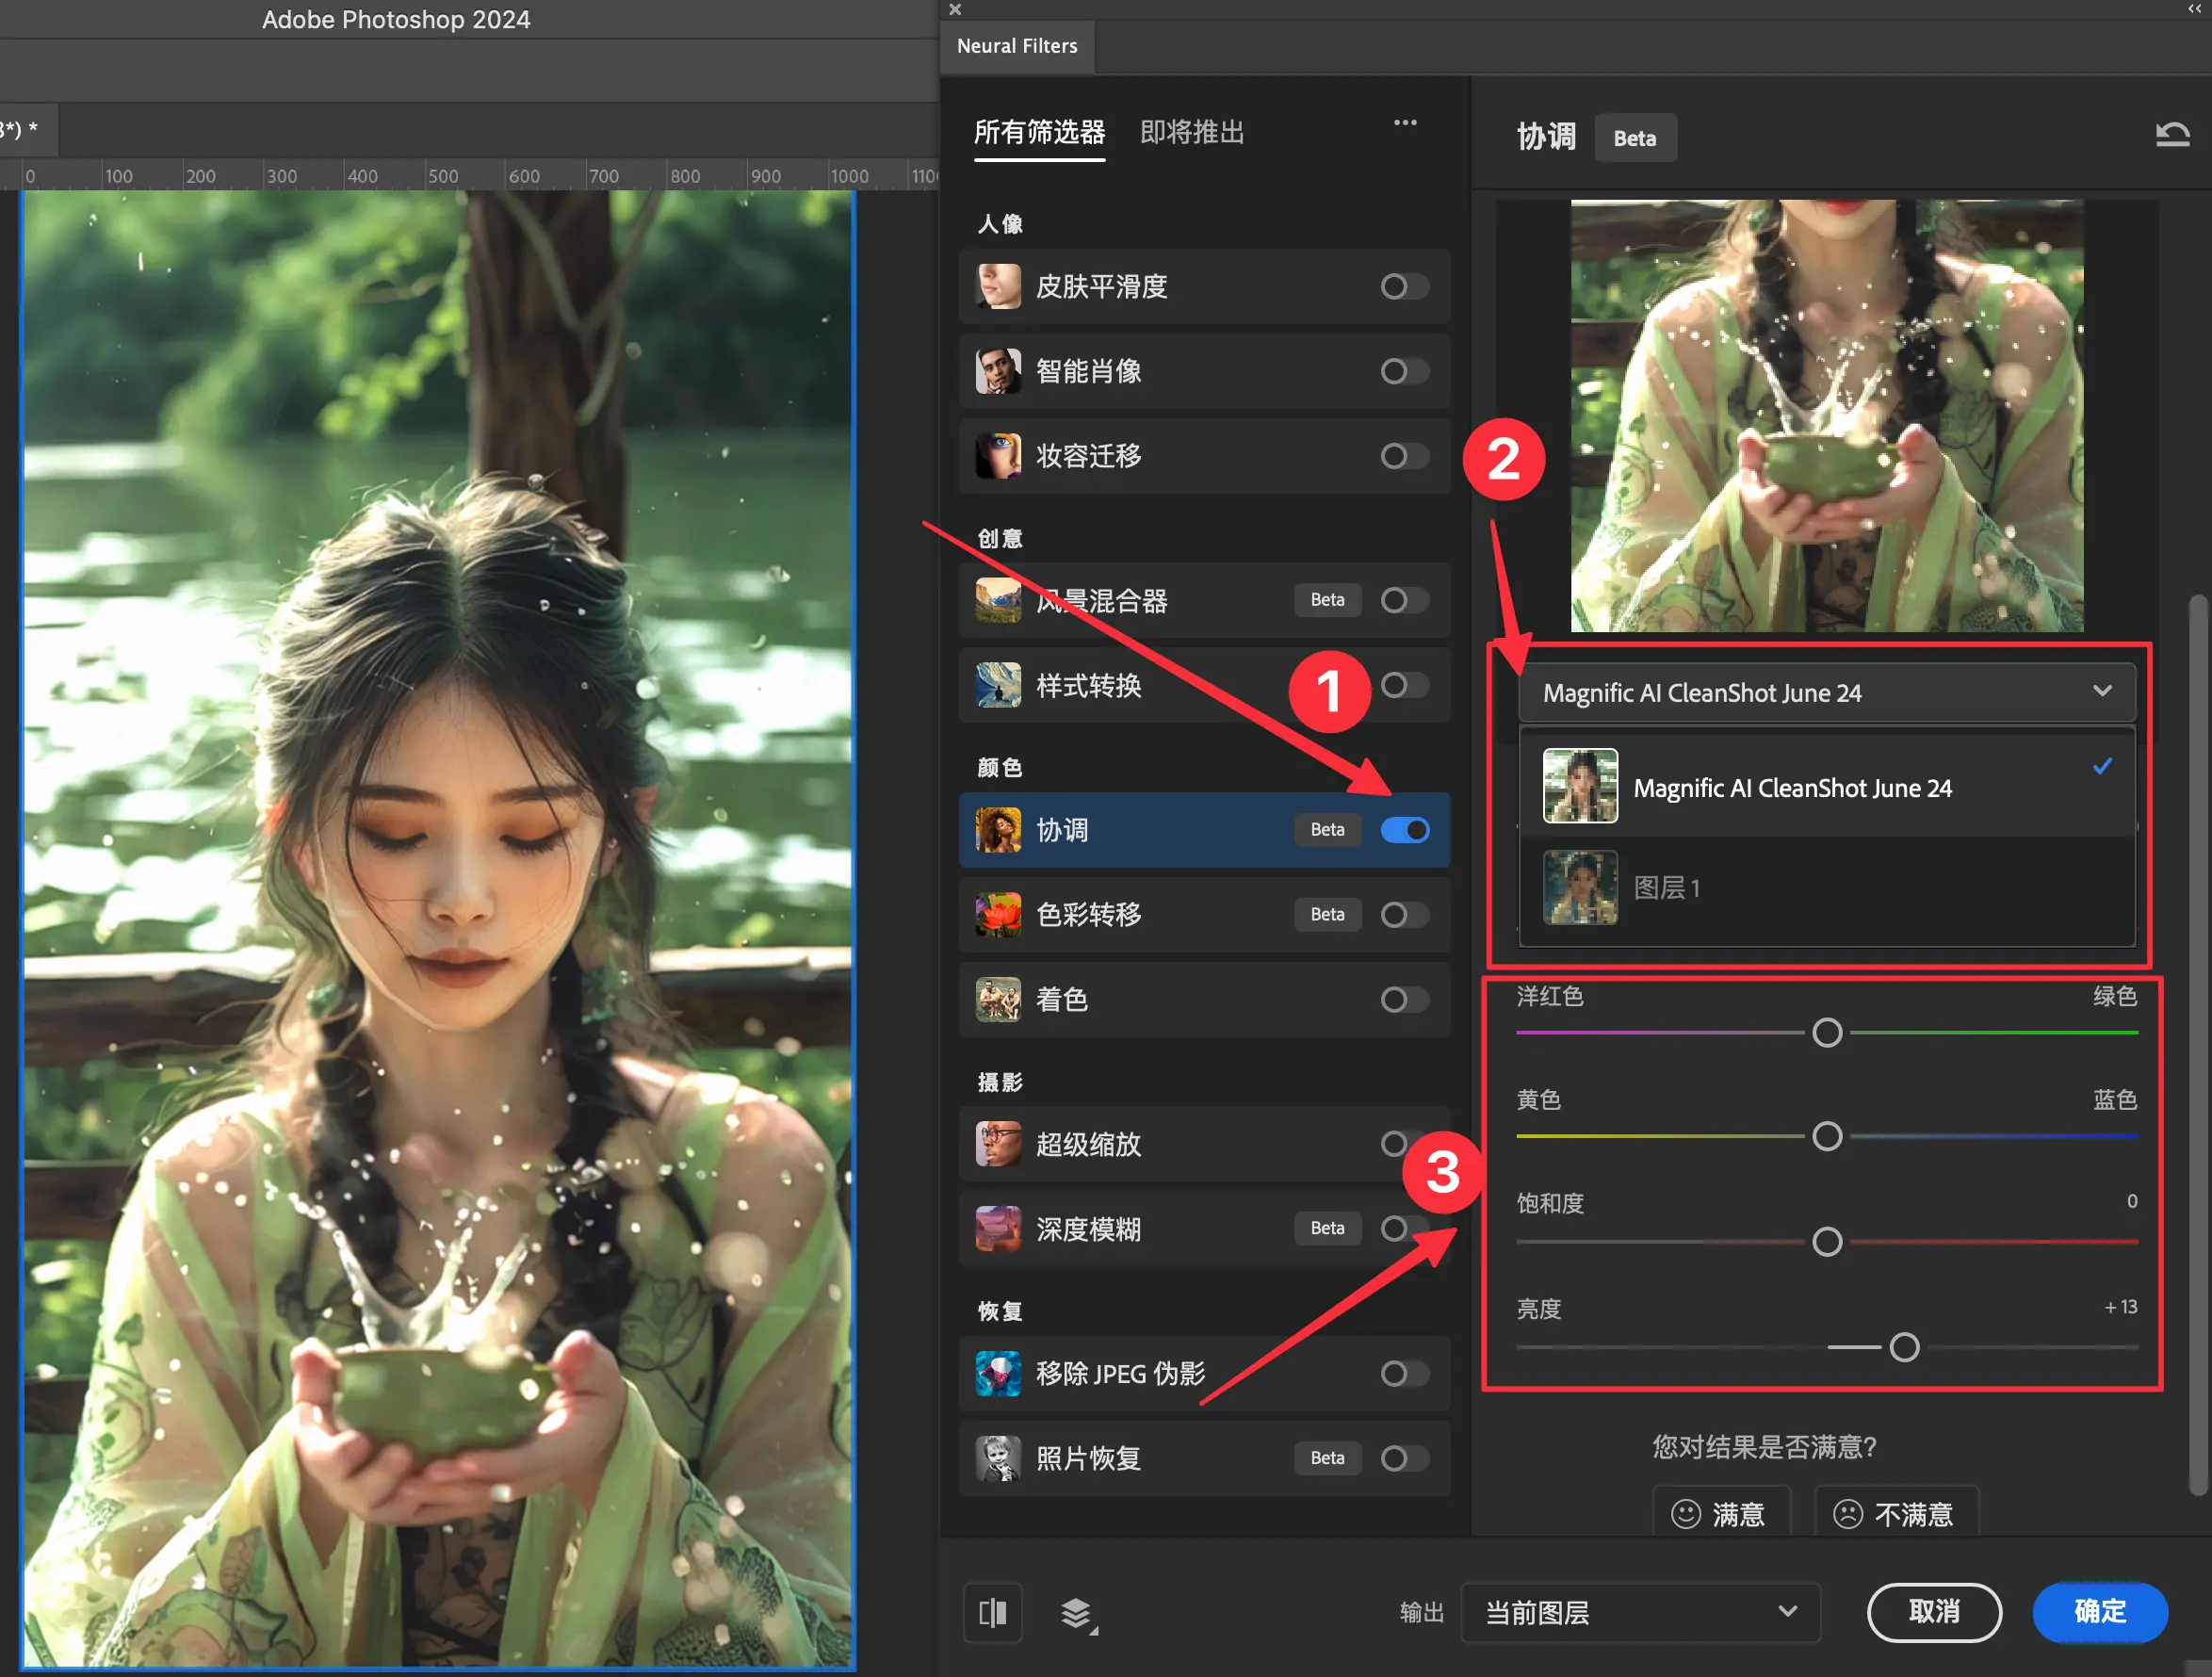
- 选中这个新图层,利用 PS 的 Neural Filters → 协调 → 把 Magnific 的图片作为参考图层 → 调整参考强度和其他参数。这个地方具体强度数值是多少,只需根据自己的理想情况调整就可以了。比如我这里就是参考强度拉满,顺便提高了一下亮度。
- 现在,如果你对面部光线融合的效果不满意,你还可以用鼠标点击 Magnific 图层并按 Cmd + J 抠出一个选区一致的图层。放在所有图层最上面,然后选一个合适的图层叠加模式。在这里,你不需要了解每种叠加模式的原理是什么。只需像下图演示这样,鼠标悬浮划过去一遍看看哪种叠加效果最满意。选择好了之后,再关闭/打开图层左边的小眼睛按钮进行对照。在本例子中,我就不做这一步了,因为我觉得第 3 步效果已经很不错了。但是之后我们讲到 Trozk 的那个案例,你可能需要用到这一步。尤其是 Sspai 那个案例中的发光显示屏。(见:https://x.com/lyson_ober/status/1804848156766851416)
- 现在解决抠图边缘不融合的情况。其实针对这种问题有无数种解决方法,但是我认为有了 AI 之后,最简单的方法就是选择一个非常窄的边缘选区,然后用 PS generative fill 即可。这个方法的好处是:效果很不错、学习成本低,以至于新手小白都能上手。
- 首先,我们用钢笔工具沿着边缘内部画一个圈(迅速点点点就行,别管精细度)。
- 随后,我们还是 Cmd + Enter 建立选区(得到蚂蚁线)。
- 点击窗口上的选择菜单 → 存储选区 → 命名为 contract。
- 接着,我们点击选择菜单 → 扩大选区 → 15px(根据你的具体情况而定)
- 选择 → 载入选区 → 从选区中减去 → 这样就得到了一个圆环区域。相当于大区域减去小区域,于是得到了圆环区域。
- 如果大小不合适,你可以在此圆环区域的基础上扩大或缩小范围。
- 使用 AI Generative Fill,完成~
- 补充,一个小技巧。事实上,手机修图软件已成为大众的日常需求。所以你甚至还可以使用醒图(Hypic)等软件对人物面容的下颌线等部位进行修饰,效果更佳!
- 而接下来这个产品案例,你也可以在特效部分添加辉光等特效。
- 又或者,你是专业人士,那就不用我多说了,直接 PS 里快捷键 Cmd + Shift + A 打开 Camera Raw 进一步调色或者 Cmd + Shift + X 打开液化工具。
- 如果你不会调色,我还是强烈建议大家研究一下简单调整各色相、饱和度、亮度的基础操作,这将帮助你更好地还原色彩。
- 例如本案例中,我简单调整了一下照片的曝光和绿色的亮度。
Magnific 电商产品案例拆解
这部分其实思路和上面完全一致,比如以少数派 Sspai 和 Trozk 合作的积木插座为例。
我们再来演示一个,先准备好原图,然后我去 Catjourney 找到一张图片作为氛围光参考图。
Light transfer strength 100%,直出效果如下。可以看到环境和光源融合得很不错,但是产品也确确实实发生了变形,在电商领域这种事情万万要不得。然而,图片中“变形的产品”的光源信息确实没问题,不要浪费这个信息!现在可以通过图层叠加的方式与经过了 Neural Filters 的原图进行融合了~(请回忆人像摄影部分讲到的步骤)
下面我们演示一下 PS 中的简单操作过程。请注意,由于这个案例中原图的像素本身并不高,所以要想保证效果更佳,请保证你的原图像素和画质尽可能高一些。视频在这里:https://x.com/lyson_ober/status/1805249123639247247
最后补充一点,如果叠加后有一些细节上的瑕疵,你还可以选中上面这个图层(magnific - main),然后按快捷键 e 用橡皮擦工具擦掉不需要的部分。另外,键盘快捷键 [ 和 ] 分别代表缩小和放大橡皮擦大小。抠图的方法有很多种,如果你嫌麻烦,Clipdrop 的自动抠图效果不错:https://clipdrop.co/remove-background
本期就到这里啦!喜欢记得关注,或是订阅我们的 Newsletter:https://quail.ink/catjourney
![[Catjourney #002] How to Combine Midjourney with 3D](https://static.quail.ink/media/vmmekix95.webp)
![[Catjourney #000] Introducing Catjourney Weekly Newsletter](https://static.quail.ink/media/n22lxs8g8.webp)
![[Catjourney #004] How to Use the Catjourney Prompt Generator](https://static.quail.ink/media/kzzoms4ze.webp)
![[Catjourney #003] How to change into new clothes using Midjourney and IDM-VTON](https://static.quail.ink/media/n22lxsmy6.webp)
![[Catjourney #001] I Hear the Soft Whispers of Your Eyes](https://static.quail.ink/media/9zzn4s3p8.webp)